Our blog
How to get touchscreen working
Some Linux distros come with these drivers included in kernel, others not. If you can’t use touchscreen after Linux is running in X GUI mode or if you don’t have assigned input device in console mode, then you should do the following:
- First of all, check all connections. We had many cases when customers forgot or incorrectly connected touchscreen to miniUSB add-on board.
- Connect just touchscreen through USB cable to normal PC running Windows. If touchscreen is detected and you can use it in Windows, then all connections are OK and you can proceed further.
- If your Linux kernel does not include drivers for touchscreen, then you should recompile kernel with the following options:
- for AUO LCD (1024×600 px): “Device Drivers –> HID Devices –> Special HID drivers –> HID Multitouch panels“, option name: CONFIG_HID_MULTITOUCH, available in mainline kernel since version 2.6.38
- for LG LCD (1280×800 px, black frame): “Device Drivers –> HID Devices –> Special HID drivers –> N-Trig touchscreens“, option name: CONFIG_HID_NTRIG, available in mainline kernel since version 2.6.31
- If you run Android, then you can encounter problem with non-correct touchscreen vs screen resolution. This happen because Android supposes default screen resolution for external LCD as 720p or 1080p (touchscreen is connected by USB and is considered as external device), but our LCD is 1024×600 or 1280×800. You can easy check it by simply turning on option “Show touches” in Settings->Developer options of Android. Then you will notice the difference in real position of touch and Android touch position. This can be easy improved by placing one of below files to /system/usr/idc folder of Android rootfs. After that touchscreen size and LCD size will match.
File for Ntrig touchscreen (1280×800, black frame)
File for Cando touchscreen (1024×600)
See below links for additional information on touchscreen devices functionality under Android:
Touch devices in Android
Input device configuration files - You can use console command getevent (sources for Linux are here: getevent.zip) to check what touchscreen returns when you touch it. Also, you can get more details about touchscreen and its modes with commands getevent -p and getevent -i.
- N-trig touchscreen can be tuned with some parameters:
- min_width – minimum touch contact width to accept
- min_height – minimum touch contact height to accept
- activate_slack – number of touch frames to ignore at the start of touch input
- deactivate_slack – number of empty frames to ignore before deactivating touch
- activation_width – width threshold to immediately start processing touch events
- activation_height – height threshold to immediately start processing touch events
They can be changed right from console, see here for details: http://baruch.siach.name/blog/posts/linux_kernel_module_parameters/
- If you have problems with touchscreen, like “crazy” cursor jumps or “phantom” mouse clicks, then try to follow this guide How to calibrate N-Trig touchscreen
- Still no success? Drop e-mail to support@chalk-elec.com and provide description of problem + photo of your LCD touch connection + output of commands “lsusb” and “dmesg” entered in Linux console.
How to connect RaspberryPi to LCD and have fun
You will need:
1. LCD panel
2. LVDS cable with attached miniUSB connector (for touch controller) and ambient light sensor
3. HDMI-LVDS converter
4. miniUSB cable – optionally available during order
5. Power adapter (5V, at least 2A) – optionally available during order
All above you will receive with our LCD bundle order.
Also, you will need additionally:
6. SD card
7. microUSB cable to power RasPi
8. RaspberryPi board itself
Here are the steps to get LCD working:
1. Download latest image of Raspbian from www.raspbian.org or www.raspberrypi.org. I used version “2012-09-18-wheezy-raspbian” for demo.
2. Create SD card based on this image.
3. – if you have 10″ LG panel and your HDMI board has U5 chip installed, then skip to p.4
– if you have 7″ CPT panel with resistive touchscreen, then download this config.txt file and put it to the root of boot partition of SD card
– if you have old HDMI board and 10″ LG panel, then open file called “config.txt” on just created SD card and add single line at the top: “hdmi_edid_file=1″, then download file edid.dat and copy it to the root of boot partition of SD card
– if you have your own LCD, then you should create binary EDID file (full file name edid.dat) yourself following datasheet of your LCD and copy this “edid.dat” file to the root of boot partition of SD card
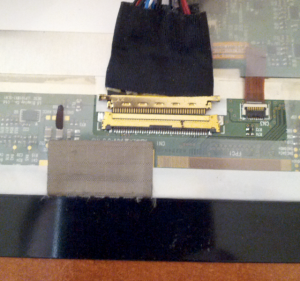
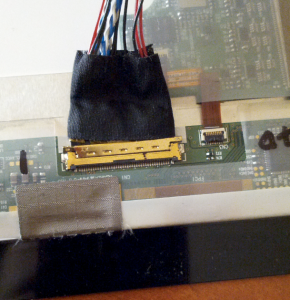
4. Connect LVDS cable to LCD as on below photos. Cable connector should be fully inserted into mate connector on backside of LCD.
5. Connect LVDS cable to HDMI-LVDS board as on below photo. Pin 1 of cable is marked with white dot.
6. Connect microUSB cable from HDMI-LVDS board to RasPi microUSB connector.
7. Connect miniUSB cable between RasPi USB port and small red board that is part of LVDS cable.
8. Connect cable of power adapter to HDMI-LVDS board.
9. Turn on power, this will start your RaspberryPi and you should get image on screen immediately. During first run Raspbian will run configuration utility. Touchscreen is not working at yet, and you will need usual USB keyboard to enable option “Start desktop on boot”.
10. After RasPi will restart to GUI, you will be able to use touchscreen as a mouse.
Final SD card image for 10″ LCD (at least 4Gb card) is here: SD card test image
We use this SD card image to test our bundles before shipping.
Some of our first customers (who placed order in September) can encounter problems with LCD backlight. If you see that backlight is not turned on when you apply power to our HDMI-LVDS board (screen is completely black, no light from the side view of LCD), then you has 2 ways to improve this:
1. Short pins 1 and 3 on white 6-pins connector (CON4). Pin 1 has square shape, others pins have round shape. Don’t worry if you short pin 2 as well – it is not connected anywhere.
or
2. Short pins 1,2,3 on PIC microcontroller (U3). Pin 1 is marked with white dot. Don’t worry if you short pin 4 as well – it anyway tied up to power.
UPDATE: here is interesting post from one of our customers about his experience with connection of our 10″ LCD Raspberry Kiosk
RasPi performance with touchscreen LCD
We had many questions from our customers regarding video from previous post on release RaspberryPi LCD solution: https://www.chalk-elec.com/?p=1553
One guy on forum noticed that CPU usage is 100% during whole demo, others guys decided that problem is with drivers for our LCD/touchscreen and this can burn main processor 🙂
In real, problem is not with driver, but with python game Gemgem. I asked our engineer to record 2 videos: one with normal LCD monitor and mouse, and another with our LCD+touchscreen, with the same version of Raspbian and system settings as in original video. I will gift LCD bundle to first guy who will find any difference in performance on both videos.
Long awaited RaspberryPi LCD solution is here!
Ok, we have important announcement to make for all RaspberryPi fans out there, including all members of our team as well. We have been working on the LCD solution that converts HDMI to LVDS, which allows you to connect LCD panel to RasPi. It looks like this:
I know that many guys has been expecting for RasPi LCD solution from us many months ago. I personally got millions of emails and requests about the release date. We made mistakes trying to implement it with DSI interface that is available on Raspberry Pi. We even made agreement with Toshiba about their DSI-LVDS bridge IC. Unfortunately, DSI in controlled through GPU, and all GPU code is closed by Broadcom. Big mistake, that cost us several months.
Current solution works through HDMI interface. So, this adapter is pretty universal, and can be used to connect bare LCD LVDS panel also to others boards with HDMI interface (I have dozen of them on my table for tests).
You can buy our HDMI-LVDS converter and try to connect to own LCD panel, but I would suggest to get it in bundle with our 10″ LCD that has integrated multi-point capacitive touchscreen. It is just $134.99 for whole bundle – and you will get your own extra cheap ($170 including RasPi price) 10″ tablet with high quality IPS screen, a great 1280×800 resolution, capacitive multi-point touchscreen and RaspberryPi as a heart.
Video of bundle in action:
Make 10″ tablet with your RaspberryPi
Link to web-store: https://www.chalk-elec.com/?page_id=1280#ecwid:category=3094861&mode=category&offset=0&sort=priceAsc
We have limited quantity at the moment, so hurry up! Next batch will be available in September.


