Archive for How-To
How to use FullHD+ LCD
Our 10″ FullHD+ LCD bundle supports 24-bits color and has WUXGA (1920×1200 px) resolution. Take note that your host board should support 1920×1200 resolution, otherwise you will get no video output.
Bundle consists of LCD panel, HDMI converter board, and LVDS cable to connect converter to LCD panel. You can also buy optional cables (miniHDMI and miniUSB), power supply to power converter and LCD, ambient light sensor for automatic brightness control, and LCD holder: 10″ FullHD+ LCD with HDMI interface
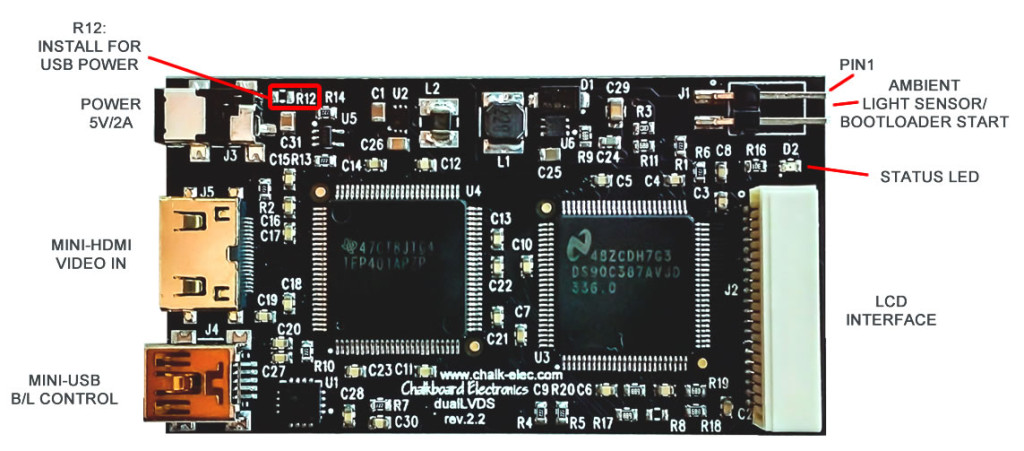
HDMI-dualLVDS converter board has the following connectors:
Connecting LCD
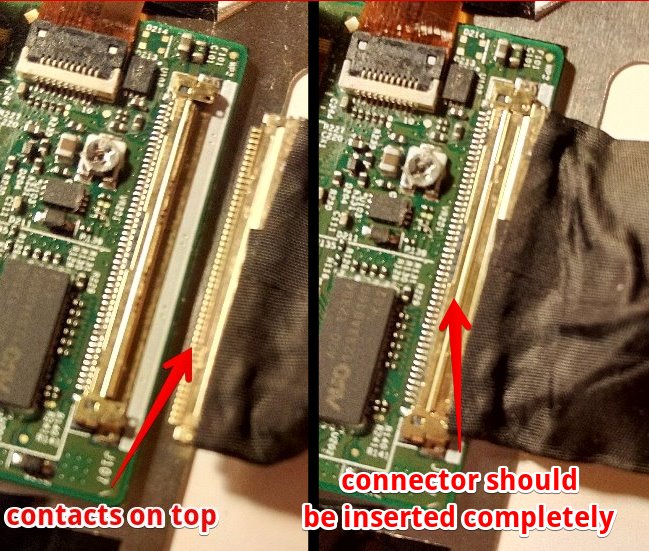
You should use included LVDS cable to connect LCD to HDMI converter board. Please, take care to correctly insert LCD side of cable – contacts should be on top. Use your nails or tweezers to insert cable completely into LCD connector.
Optional ambient light sensor should be connected with red wire into pin 1 on board connector:
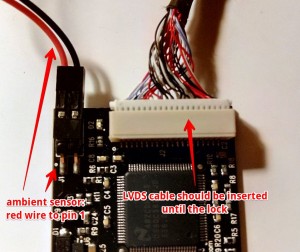
Logic and backlight voltages for LCD are generated on board and supplied by the same LVDS cable, so you don’t need separate power supply for LCD or backlight voltage generator.
Powering LCD
LCD with converter board take up to 1.2A/5A when backlight is set to maximum value. Board and LCD can be powered either by external power supply (5V at least 2A, jack is OD=2.6mm, ID=0.65mm, positive central pin) or by USB. By default it can be powered by external supply only. For USB power you should install 0R resistor in R12 position. Check that your USB host can provide enough current. CAUTION! Do not connect external power supply when R12 is installed, it can damage your USB port.
Basic LCD functionality
We ship LCD with simple demo firmware that turns on LCD backlight and video processor when input video signal is detected. If video signal is lost, LCD backlight will be turned off. On-board LED shows status of video signal – LED is on when active video signal is detected. You can always check that hardware is working well by connecting LCD with this basic firmware into standard PC running Windows. For advanced functionality you will need to update firmware as described below.
Firmware update with USB bootloader
We constantly release new firmware for our products to extend functionality and fix possible bugs. Converter board has embedded USB bootloader for easy firmware update. To update firmware you should switch converter board to bootloader mode by shorting both pins on ambient light sensor connector with jumper, then turn on power. Green LED will light on, and you will have 3 seconds to remove jumper in order to start bootloader. Green LED will blink when bootloader is active. You should follow steps 4 and 5 of this firmware upload procedure: Firmware upload.
HID USB bootloader program for PC is available here: HID USB bootloader.
Latest version of firmware is always available here: FullHD+ firmware
Ambient light sensor and backlight brightness
Ambient light sensor is available as an option, and can measure ambient light level for automatic brightness control.

Ambient light sensor should be connected to connector J1, red color wire to pin 1 on connector. You will need latest firmware in order to get automatic backlight control. Also, with last firmware you can control backlight from your host board or PC through USB HID commands: How to control LCD backlight (USB HID)
- Maximum brightness (MAX_BL parameter) is 35 for this 10″ LCD
- Report ID for backlight control is 0
Converter board schematic
Board schematic is available here: http://goo.gl/NSWTIQ
Technical drawing of LCD
Technical drawing of LCD is available here: FullHD+ LCD drawing
See in action
Video with dualLVDS converter board and our FullHD+ LCD is available here: FullHD+ LCD with HDMI dualLVDS converter
Follow us on Twitter to get instant notification about new firmware release: Follow @ChalkElec
How to control LCD backlight (USB HID)
Starting from version 2.0 all firmwares for our LCD and HDMI converters support LCD backlight control through standard USB HID protocol.
HID report descriptor
The following HID report descriptor is used:
1 2 3 4 5 6 7 8 9 10 11 12 13 14 15 16 17 18 19 20 21 22 23 | 0x05, 0x0C, // Usage Page (Consumer) 0x09, 0x01, // Usage (Consumer Control) 0xA1, 0x01, // Collection (Application) 0x15, 0x00, // Logical Minimum (0) 0x25, 0x01, // Logical Maximum (1) 0x75, 0x01, // Report Size (1) 0x95, 0x07, // Report Count (7) 0x19, 0x6F, // Usage Minimim (0x6F) 0x29, 0x75, // Usage Maximum (0x75) 0x91, 0x02, // * Output (Data, Var, Abs) 0x95, 0x01, // Report Count (1) 0x91, 0x03, // * Output (Const, Var, Abs) 0x25, 0x23, // Logical Maximum (35) 0x75, 0x08, // Report Size (8) 0x09, 0x71, // Usage (0x71 - Display Brightness) 0x91, 0x02, // * Output (Data, Var, Abs) 0x09, 0x35, // Usage (0x35 - Illumination) 0x26, 0xFF, 0x00, // Logical Maximum (255) 0x81, 0x02, // ** Input (Data, Var, Abs) 0x05, 0x20, // Usage Page (Sensors) 0x09, 0x41, // Usage (0x41 - Ambient Light Sensor) 0x81, 0x02, // ** Input (Data, Var, Abs) 0xC0 // End Collection |
Report usages follow recent changes in official USB HID specification proposed by Microsoft in change request #HUTRR41. Interface # is 0 for HDMI-dualLVDS converter and FullHD+ LCD bundle, Interface # is 1 for open frame/black frame 7″ LCD and for new 10″ integrated LCD. Report ID is 0 for all cases.
Packet format
Firmware accepts 2-bytes packet request from host and reply with 2-bytes packet with information about current backlight mode and ambient light level:

Only one bit can be active in command byte of request packet. If bit 5 is active (Set Brightness command), then next byte contains desired brightness level. For others commands second byte is ignored. LCD will reply with current backlight status and ambient light sensor value to any received command. To get current status without performing command you can send request with command byte equal to 0. MAX_BL is 35 for HDMI-dualLVDS converter and FullHD+ LCD bundle, MAX_BL is 18 for open frame/black frame 7″ LCD and for new 10″ integrated LCD.
How to send commands
The simplest way to communicate with HID devices is to to use cross-platform library HIDAPI from Signal11. With HIDAPI it is just several lines of code to control LCD brightness:
1 2 3 4 5 6 7 8 9 10 11 12 13 14 15 16 17 18 19 20 21 22 23 24 25 26 27 28 29 30 31 32 33 34 35 36 37 38 39 40 41 42 43 44 45 46 47 48 49 50 51 52 53 54 55 56 57 58 59 60 61 62 63 64 65 66 67 68 69 70 71 72 73 74 | #include <stdio.h> #include "hidapi.h" // Try to open HID device and return pointer to opened device hid_device* openHID() { struct hid_device_info *devs, *cur_dev; hid_device* device = NULL; int iface = 1; // We use interface# 1 for 7" and 10", and interface# 0 for dualLVDS/FullHD+ // VID=0x04D8, PID=0xF724 for 7" and 10" multi-touch firmware, interface# is 1 // VID=0x04D8, PID=0xF723 for 7" and 10" single-touch firmware, interface# is 1 // VID=0x04D8, PID=0x003F for dualLVDS/FullHD+, interface# is 1 devs = hid_enumerate(0x04D8, 0xF724); if (devs == NULL) { devs = hid_enumerate(0x04D8, 0xF723); if (devs == NULL) { devs = hid_enumerate(0x04D8, 0x003F); if (devs == NULL) return NULL; else iface = 0; } } // Walk through all enumerated devices to find one with correct interface number cur_dev = devs; while (cur_dev) { if ((cur_dev->interface_number) == iface) { device = hid_open_path(cur_dev->path); printf("Found Backlight interface at path: %s", cur_dev->path); break; } cur_dev = cur_dev->next; } hid_free_enumeration(devs); return device; } int main(int argc, char *argv[]) { hid_device* device=NULL; unsigned char buf[3]; buf[0] = 0x0; // Report ID (0) buf[1] = 0x04; // Command (0x20 - Set Backlight) buf[2] = 9; // Backlight value for command Set Backlight hid_init(); device = openHID(); if (device == NULL) { puts("Can't find USB device with interface for backlight"); return -1; } hid_set_nonblocking(device, true); printf("Writing bytes: %02X,%02X,%02X\n", buf[0], buf[1], buf[2]); if (hid_write(device, buf, 3) == -1) { puts("Error writing bytes to device!"); hid_close(device); return -1; } if (hid_read_timeout(device, buf, 2, 100) == -1) { puts("Error reading bytes to device!"); hid_close(device); return -1; } printf("Received bytes: %02X,%02X\n", buf[0], buf[1]); return 0; } |
Above example is universal and will work with all our products with USB backlight control feature.
GUI application for LCD control
Cross-platform GUI application to control different LCD settings including brightness is available here:
LCD control GUI
You will need Qt framework to build it from sources.
See in action
Video with backlight test using our dualLVDS converter FullHD+ LCD is available here: Backlight test video
Follow us on Twitter to get instant notification about updates: Follow @ChalkElech
How to use HDMI-dualLVDS converter
Our dualLVDS converter has two LVDS channels and supports 24-bits color panels with up to WUXGA (1920×1200 px) resolution. It also has on-board configurable backlight voltage generator and microcontroller with USB interface. We offer this converter as a standalone product, and also in bundle with 10″ WUXGA panel.
DualLVDS converter board has the following connectors:
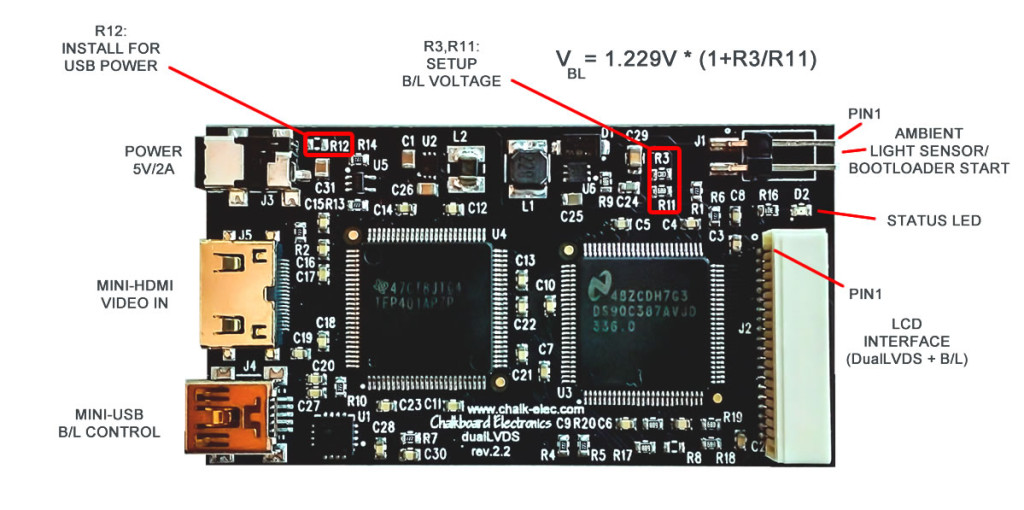
Powering board
Converter board alone takes up to 0.4A current in active mode, with connected 10″ FullHD+ current goes up to 1.2A when backlight is set to maximum value. Board and LCD can be powered either by external power supply (5V at least 2A, jack is OD=2.6mm, ID=0.65mm, positive central pin) or by USB. By default it can be powered by external supply only. For USB power you should install 0R resistor in R12 position. CAUTION! Do not connect external power supply when R12 is installed, it can damage your USB port.
Backlight voltage generator
Converter has on-board configurable backlight voltage generator that can deliver up to 35V/1A. Backlight voltage can be set with R3, R11 resistors (see above picture for formula). We supply boards with default 24V backlight voltage. Take note that R11 should be in 5K – 20K range. If LCD backlight takes more than 3W, then U6 and L1 inductor can have temperature up to 100C degree. In this case you should use additional heat sink to avoid overheating.
LVDS cable
If you buy standalone board, then you will need to make your own LVDS cable for your LCD panel. We supply mate housing connector and 50 pcs of pin terminals together with board, they can be crimped to cable wires with AWG #32 crimp tool. We recommend using PA-09 crimp pliers, it has affordable price and provides high quality results. Below is pinout of LVDS connector, PDF version is available here: dualLVDS board pinout.
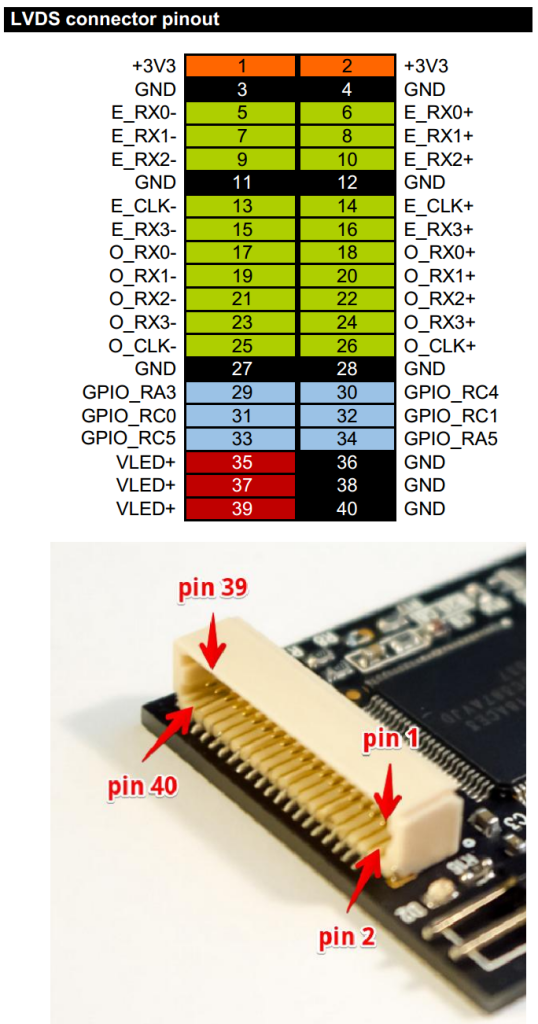
Pins GPIO_xxx are connected directly to PIC microcontroller and can be used to control different functions of LCD. We ship board with our standard example program (see source code below) that uses pin GPIO_RA5 to turn on LCD backlight when input video signal is detected. If video signal is lost, LCD backlight will be turned off. Also, pin GPIO_RC5 is connected to PIC PWM generator, and can be used to control brightness of LCD backlight.
Update of EDID information
We supply our converter board with pre-loaded EDID data for our 10″ FullHD+ LCD (resolution 1920×1200 px). You will need to update EDID information in converter in order to use it with your own LCD. EDID update procedure is described here: How to program custom EDID data in HDMI converter
Firmware update with USB bootloader
Board is supplied with embedded USB bootloader for easy firmware upload. To update firmware you should start board in bootloader mode by shorting both pins on ambient light sensor connector with jumper, then turn on power. Green LED will light on, and you will have 3 seconds to remove jumper in order to start bootloader. Green LED will blink when bootloader is active. You should follow steps 4 and 5 of this firmware upload procedure: Firmware upload HID USB bootloader is available here: HID USB bootloader. You can use firmware for our FullHD+ LCD bundle for your own LCD projects, latest version of firmware is available here: dualLVDS/FullHD+ firmware
Building PIC firmware
To build own PIC firmware you will need MPLAB.X environment from Microchip with XC8 compiler: MPLAB X, XC8 compiler.
Bootloader occupies the program memory region 0x000-0x903. The application firmware is supposed to occupy the 0x904-[end of flash] region of program memory.
Here are two linker setting changes that are required for the application project:
- Under the build configuration–>XC8 global options–>XC8 linker–>Option categories:Additional options the “Codeoffset” must be set to: 0x904
- Under the build configuration–>XC8 global options–>XC8 linker–>Option categories:Memory model, the “ROM ranges” must be set to: default,-0-903
In addition to the above, make certain that all configuration bit settings between the bootloader firmware project, and the application firmware project, match 100% exactly, see our example firmware for details:
1 2 3 4 5 6 7 8 9 10 11 12 13 14 15 16 17 18 19 20 21 22 23 24 25 26 27 28 29 30 31 32 | #include "typedefs.h" __CONFIG(FOSC_INTOSC & WDTE_OFF & PWRTE_ON & MCLRE_OFF & CP_OFF & BOREN_ON & CLKOUTEN_OFF & IESO_OFF & FCMEN_OFF); __CONFIG(WRT_OFF & CPUDIV_NOCLKDIV & USBLSCLK_48MHz & PLLMULT_3x & PLLEN_ENABLED & STVREN_ON & BORV_LO & LPBOR_OFF & LVP_OFF); #define _XTAL_FREQ 48000000 // Frequency of crystal (INTOSC in our case) void main(void) { OSCCON = 0xFC; // 3x PLL enabled from 16MHz HFINTOSC ACTCON = 0x90; // Enable active clock tuning from USB while(OSCSTATbits.PLLRDY == 0); // Wait for PLL ready/locked ANSELAbits.ANSA4=0; TRISAbits.TRISA4=1; // Define SCDT In pin (input) LATAbits.LATA5=0; TRISAbits.TRISA5=0; // Define SCDT Out pin (output, default to 0) LATCbits.LATC5=0; TRISCbits.TRISC5=0; // Define PWM pin (output, default to 0) LATCbits.LATC3=1; TRISCbits.TRISC3=0; // Define LED pin (output, default to 1 - LED Off) while(1) { // If video signal is detected if (PORTAbits.RA4) { LATAbits.LATA5=1; // Enable video outputs LATCbits.LATC5=1; // Enable backlight (PWM=1 - max. brightness) LATCbits.LATC3=0; // Turn LED On } // If video signal is lost else { LATAbits.LATA5=0; // Disable video outputs LATCbits.LATC5=0; // Disable backlight (PWM=0 - turn off backlight) LATCbits.LATC3=1; // Turn LED Off } } } |
Ambient light sensor and backlight brightness
Ambient light sensor is available as an option, and can measure ambient light level for automatic backlight control.

Ambient light sensor should be connected to connector J1, red color wire to pin 1 on connector. Light level is available as a voltage in range 0 (dark) to 2.5V (max. light) on pin RC2 (ADC channel 6) of PIC microcontroller. Backlight brightness can be controlled with help of PWM signal on GPIO_RC5. Additional information about backlight control through USB HID commands is available in this how-to: How to control LCD backlight (USB HID)
Board schematic
Board schematic is available here: http://goo.gl/NSWTIQ
See in action
Video with dualLVDS converter board and our FullHD+ LCD is available here: FullHD+ LCD with HDMI dualLVDS converter
Follow us on Twitter to get instant notification about new firmware release: Follow @ChalkElec
How to use our new 10-inch integrated LCD
Prerequisites
For first startup you will need:
- 10″ integrated LCD panel
- miniHDMI cable (available as an option)
- 5V/2A power supply, jack is OD=2.6mm, ID=0.65mm, positive (+) central pin (available as an option)
- miniUSB cable for touchscreen (available as an option)
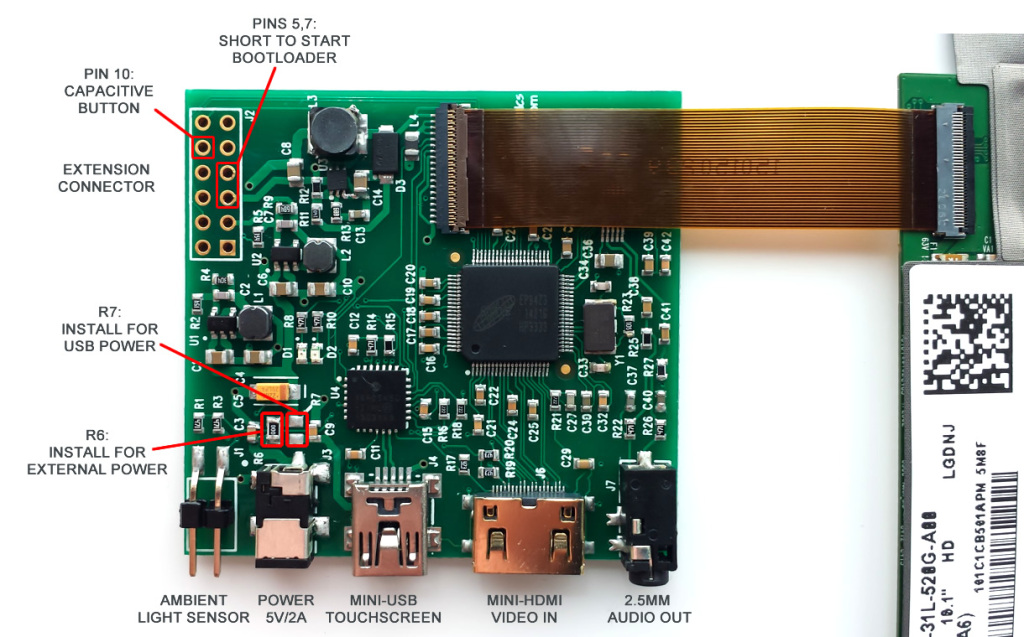
LCD control board is fixed on the back side of LCD and connected to LCD panel by FPC cable:
Powering LCD
LCD with control electronics takes around 1.2A current when backlight is set to maximum value, and it can be powered either by external power supply (5V/2A, jack is OD=2.6mm, ID=0.65mm, positive central pin) or by USB. Power mode is selected by installing one of 0R resistor – R6 for normal power supply or R7 for USB power. CAUTION! Do not install both resistors at once, because this can damage USB port on your computer.
By default we supply LCD with R6 installed, therefore you will need external power supply to run LCD. For USB power you should change 0R resistor from R6 position to R7 position, and make sure that your USB port can continuously provide at least 1.2A current. Power consumption can be significantly decreased by lowering backlight level.
Firmware upgrade
We constantly add new features and provide bug fixes by releasing new firmware for our LCD panels. To update firmware you should start LCD in bootloader mode by shorting pins 5 and 7 on extension header before switching on power, then follow this firmware upload procedure: https://www.chalk-elec.com/?p=1826
New firmware for this 10″ panel is available here: http://goo.gl/wg8WY5
Follow us on Twitter to get instant notification about new firmware release: Follow @ChalkElec
Capacitive touchscreen
LCD touchscreen is based on capacitive technology with up to 10 fingers support, and can work in two modes depending on programmed firmware: single-touch mode and multi-touch mode. We supply LCD with default single-touch mode, because it can work without drivers with any USB host. For multi-touch mode you will need to follow firmware upgrade procedure described above and update Linux/Android kernel as per this How-to: https://www.chalk-elec.com/?p=2028
Ambient light sensor and backlight control
Starting from version 2.0 firmware for our 10″ integrated LCD supports LCD backlight control through standard USB HID protocol and automatic backlight control with optional ambient light sensor. Ambient light sensor should be connected to connector J1, red color wire to pin 1 on connector (pin 1 is marked with white dot). Additional details about backlight control from your host board or PC through USB HID commands are available here: How to control LCD backlight (USB HID).
- Maximum brightness (MAX_BL parameter) is 18 for this 10″ LCD
- Report ID for backlight control is 0x01
Capacitive button
To be added.
How to get multi-touch working (Linux and Android)
All of our panels come with USB HID multi-touch controllers and are supported by standard “hid-multitouch” driver available in mainline Linux/Android kernel.
If your system already has this “hid-multitouch” driver available as a kernel module, then you can easy add multi-touch support by adding the following commands to your /etc/rc.local file (before “exit” statement):
1 2 | modprobe hid-multitouch echo W X Y Z > /sys/module/hid_multitouch/drivers/hid\:hid-multitouch/new_id |
where
- W – is USB bus number of touchscreen USB, can be figured out by “lsusb” command
- X and Y – are VID and PID of touchscreen USB, also can be figured out by “lsusb” command
- Z – is 1 for 7″ and 10″ panels, and 259 for 14″ and 15.6″ panels
If your system has no “hid-multitouch” driver compiled, then the following steps are required to get multi-touch working:
- Download kernel sources for your board.
- Modify hid-multitouch.c file, located in kernel/drivers/hid/ folder.
- Re-build the kernel with the HID-MULTITOUCH option enabled.
- Create an IDC (Input Device Configuration) file (required by Android only).
Let’s consider these steps in more details.
- Modify hid-multitouch.c file
First of all, you should download kernel sources and default kernel configuration file for your board. Then, you should go to kernel/drivers/hid older and find there file hid-multitouch.c. This files contain VID:PID values of USB touchscreens that will be processed by hid-multitouch driver. And we should add VID:PID of our touchscreens there. They are:- 04D8:F724 for 7″ and new 10″ touchscreens
- 0EEF:A107 for 14″ touchscreen
Open file hid-multitouch.c, find mt_devices[] struct and insert the following code at the beginning of this structure define:1
2
3
4
5
6
7
8
9static const struct hid_device_id mt_devices[] = {
/* Chalkboard Electronics 7" and 10" */
{ .driver_data = MT_CLS_DEFAULT, HID_USB_DEVICE(0x04D8,0xF724) },
/* Chalkboard Electronics 14" */
{ .driver_data = MT_CLS_DEFAULT, HID_USB_DEVICE(0x0EEF,0xA107) },
// here the rest of definitions comes - Re-build the kernel with the HID-MULTITOUCH option
Type “make menuconfig” to configure the kernel, then go to Device Drivers -> HID Devices -> Special HID drivers -> HID Multitouch panels and select it as an embedded driver (*). Save the kernel configuration and compile it to make a zImage kernel file. Transfer the zImage file to your board.
- Create an IDC file
This final step is required for Android only in order to match the resolution of the touch panel to HDMI. Create a plain text file as below:1
2
3
4
5
6
7
8
9touch.deviceType = touchScreen
touch.orientationAware = 1
device.internal = 1
keyboard.layout = qwerty
keyboard.characterMap = qwerty2
keyboard.orientationAware = 1
keyboard.builtIn = 1
cursor.mode = navigation
cursor.orientationAware = 1The file name must be Vendor_xxxx_Product_yyyy.idc, where xxxx is VID of panel, and yyyy is PID of panel. The filename is case sensitive!In our case, you should use filename Vendor_04d8_Product_f724.idc (7″ and 10″ panels) or Vendor_0eef_Product_a107.idc (14″ panel). Now copy the IDC file to your Android board (Android must be rooted) with the following commands (substitute Vendor_xxxx_Product_yyyy.idc with real file name):
1
2
3
4
5
6adb shell
su
mount -o rw,remount /system
[Ctrl-C]
adb push Vendor_xxxx_Product_yyyy.idc /system/usr/idc/.
adb reboot
That’s all. Now you should get multi-touch support working.
How to program custom EDID data in HDMI converter
EDID stands for Extended Display Identification Data (EDID), and is a data structure provided by an LCD to describe its capabilities and supported resolutions to a video source (RaspberryPi, PC, Android stick, etc.) EDID is stored in EEPROM memory chip with I2C interface on LCD receiver side. In our case this is small chip U5:
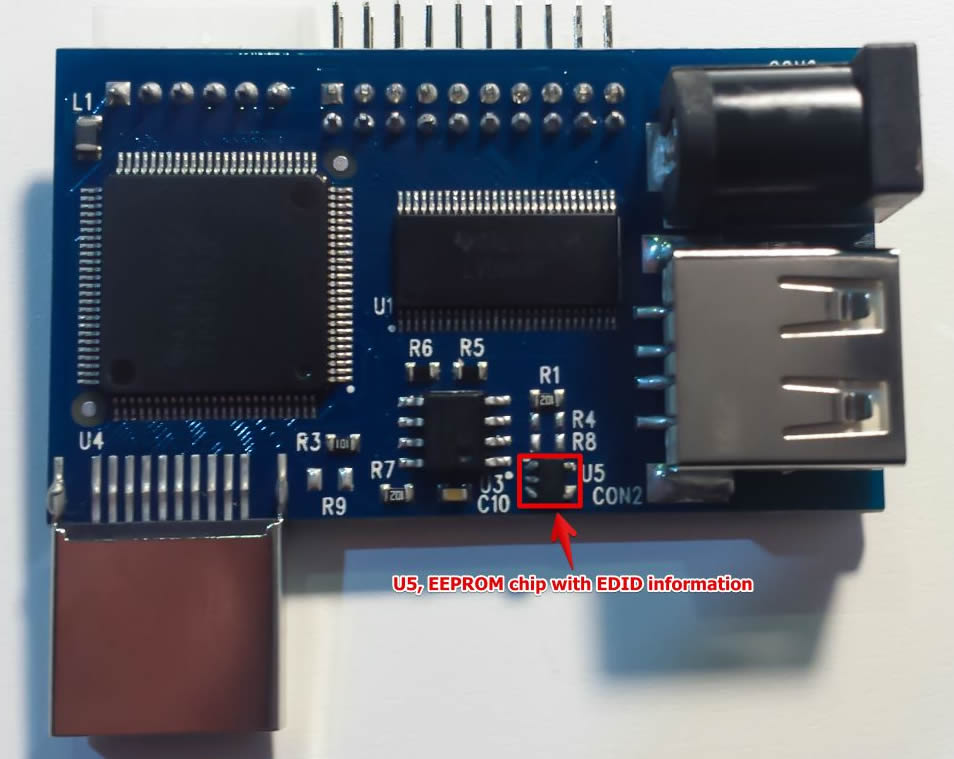

We ship our HDMI converters with pre-programmed EDID data for our standard LCD panels (1280×800 for single-LVDS, and 1920×1200 for dual-LVDS converter). If you want to use it with different LCD panel and different resolution, then you should update EDID information stored in EEPROM chip. Fortunately, this is not difficult procedure, and it will not require any special hardware tools. All you need is Linux powered PC or board (like RasPi) with HDMI output and keyboard to type in terminal commands. So, run Linux, open Terminal, connect our HDMI converter to HDMI output of PC, and power it with external power supply. Others cables are not required.
- First of all, lets install required tools. We will need Python SMBus library to read/write data to I2C bus, and EDID decode tools to represent EDID data in human-readable form:
1sudo apt-get install python-smbus edid-decode
- Then we should download edid-rw utility:
1git clone https://github.com/bulletmark/edid-rw
- And write-edid script that I wrote to simplify update process:
1git clone https://github.com/ChalkElec/write-edid
- Activate i2c-dev kernel module to get access to I2C bus:
1sudo modprobe i2c-dev
- Now we should find which I2C bus is used by our HDMI adapter. The simplest way is to try bus numbers one by one with command like:
1sudo ./edid-rw 0 | edid-decode
- In my case I found HDMI adapter on bus #3:
1sudo ./edid-rw 3 | edid-decode
I got output like this:
1
2
3
4
5
6
7
8
9
10
11
12
13
14
15
16
17
18
19
20
21
22
23
24
25
26
27
28
29
30
31
32
33
34
35
36
37
38
39
40
41Extracted contents:
header: 00 ff ff ff ff ff ff 00
serial number: 30 e4 45 03 00 00 00 00 00 15
version: 01 04
basic params: 90 16 0e 78 02
chroma info: e8 87 96 5a 55 95 28 22 51 55
established: 00 00 00
standard: 01 01 01 01 01 01 01 01 01 01 01 01 01 01 01 01
descriptor 1: 4c 1d 00 ec 50 20 18 30 40 30 57 00 d9 88 00 00 00 1b
descriptor 2: 16 12 00 80 50 20 16 30 30 20 47 00 d9 88 00 00 00 1b
descriptor 3: 00 00 00 fe 00 43 33 47 52 4e 80 31 30 31 57 58 31 0a
descriptor 4: 00 00 00 00 00 00 41 32 a8 00 00 00 00 01 01 0a 20 20
extensions: 00
checksum: 9a
Manufacturer: LGD Model 345 Serial Number 0
Made week 0 of 2011
EDID version: 1.4
Digital display
6 bits per primary color channel
Digital interface is not defined
Maximum image size: 22 cm x 14 cm
Gamma: 2.20
Supported color formats: RGB 4:4:4
First detailed timing is preferred timing
Established timings supported:
Standard timings supported:
Detailed mode: Clock 75.000 MHz, 217 mm x 136 mm
1280 1344 1392 1516 hborder 0
800 805 812 824 vborder 0
+hsync -vsync
Detailed mode: Clock 46.300 MHz, 217 mm x 136 mm
1280 1328 1360 1408 hborder 0
800 804 811 822 vborder 0
+hsync -vsync
ASCII string: C3GRN€101WX1
Manufacturer-specified data, tag 0
Checksum: 0x9a
EDID block does NOT conform to EDID 1.3!
Missing name descriptor
Missing monitor rangesI can recognize it by Manufacturer string that contains “LGD” – short code of LG Display company, and by resolutions numbers “1280” and “800” in Detailed mode string. For dualLVDS converter resolution will be 1920×1200
- Now we know I2C bus number and can program another EDID information to our HDMI adapter. But be careful to state correct bus number on the next step. Better check twice output on previous step, then check once again. If you state wrong I2C bus number, you can accidentally overwrite another I2C EEPROM with wrong data (like EDID information of main LCD panel of your notebook).
- We use the following command to update EDID with information from file edid_auo14.bin (in our case this is EDID information for our 14″ AUO panel):
1sudo ./write-edid.sh 3 edid_auo14.bin
- Let’s check that EDID has been updated:
1sudo ./edid-rw 3 | edid-decode
We should have the following output for 14″ EDID data:
1
2
3
4
5
6
7
8
9
10
11
12
13
14
15
16
17
18
19
20
21
22
23
24
25
26
27
28
29
30
31
32
33
34
35
36
37
38
39
40
41Extracted contents:
header: 00 ff ff ff ff ff ff 00
serial number: 06 af 3c 10 00 00 00 00 00 16
version: 01 04
basic params: 90 1f 11 78 02
chroma info: 10 b5 97 58 57 92 26 1e 50 54
established: 00 00 00
standard: 01 01 01 01 01 01 01 01 01 01 01 01 01 01 01 01
descriptor 1: ce 1d 56 d2 50 00 26 30 10 10 3e 00 35 ad 10 00 00 18
descriptor 2: df 13 56 d2 50 00 26 30 10 10 3e 00 35 ad 10 00 00 18
descriptor 3: 00 00 00 00 00 00 00 00 00 00 00 00 00 00 00 00 00 00
descriptor 4: 00 00 00 02 00 0c 39 cc 0d 3c 64 0f 0c 1b 6f 20 20 20
extensions: 00
checksum: 0d
Manufacturer: AUO Model 103c Serial Number 0
Made week 0 of 2012
EDID version: 1.4
Digital display
6 bits per primary color channel
Digital interface is not defined
Maximum image size: 31 cm x 17 cm
Gamma: 2.20
Supported color formats: RGB 4:4:4
First detailed timing is preferred timing
Established timings supported:
Standard timings supported:
Detailed mode: Clock 76.300 MHz, 309 mm x 173 mm
1366 1382 1398 1576 hborder 0
768 771 785 806 vborder 0
-hsync -vsync
Detailed mode: Clock 50.870 MHz, 309 mm x 173 mm
1366 1382 1398 1576 hborder 0
768 771 785 806 vborder 0
-hsync -vsync
Manufacturer-specified data, tag 0
Manufacturer-specified data, tag 2
Checksum: 0xd
EDID block does NOT conform to EDID 1.3!
Missing name descriptor
Missing monitor rangesAs you can see, Manufacturer string now contains “AUO”, and Detailed mode has resolution 1366×768, so we did everything right, and now we can use HDMI adapter with another panel (14″ AUO in our example)
How to update firmware on our touch panels and LCD
All of our new LCD and touch panel solutions are using Microchip PIC microcontroller that controls all other components like touchscreen, HDMI receiver, LVDS scaler, etc. To update PIC firmware, we should run it in bootloader mode, and upload new firmware through USB with special HIDBootloader program. Here are the required steps:
- Download Bootload application, it is available as:
- Compiled Windows application or
- Sources for compilation on Linux and Mac OS platforms
- Disconnect our panel/LCD from power supply, then:
- You should see LEDs on board (D1 and D2 on 7″ LCD, and D1 on 7″ touch controller) blinking alternately. You can remove the tweezers after that
- Also, your PC should detect new device called “HID USB Bootloader” and HID bootloader software will inform that “Device attached”.
- Then you should click button 1 in software dialog, select firmware file (.hex extension), and press button 2 to upload it. Wait until software inform that “You may now unplug or reset the device”
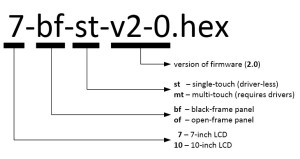
Firmware is enumerated as below. For touch-only panels and LCD-only panels you can use any version of firmware for your size LCD. In case of any technical request, please let us know version of firmware that you use
Firmware updates will be published on corresponding product pages
BeagleboneBlack and LCD
We get many questions about running recently released BeagleboneBlack with our LCD Beaglebone cape and HDMI converter. I made several tests in our lab and can confirm that both versions of our boards (cape and standalone HDMI converter) work well with BeagleboneBlack.
Below are steps required to get Linux logo on our 7″ and 10″ LCDs.
As usually, I used Robert Nelson’ Linux image in my tests.
My SD card is detected as /dev/sdb – if yours is different, then please update in step 4.
1 2 3 4 5 | wget https://rcn-ee.net/deb/rootfs/wheezy/debian-7.1-console-armhf-2013-08-26.tar.xz tar xJf debian-7.1-console-armhf-2013-08-26.tar.xz cd debian-7.1-console-armhf-2013-08-26 sudo ./setup_sdcard.sh --mmc /dev/sdb --uboot bone sync |
After that you should update uEnv.txt file on SD card in partition “boot” to setup correct LCD resolution.
I created uEnv.txt with all 4 possible combinations for our products (HDMI/cape version of board, 10″ LCD with 1280×800 or 7″ LCD with 1024×600 resolution). You should uncomment only one line, and comment others three. File is uploaded here: http://goo.gl/N03vlE
Now your image is done. If everything is OK, you will see Linux logo in 3-4 seconds after start-up.
Update: the trick is to add letter “M” after resolution in uEnv.txt file – this forces kernel to calculate LCD timings based on custom resolution.
How to calibrate N-Trig touchscreen
Normally, capacitive touchscreen does not require calibration like resistive. This is because capacitive touchscreen has grid of sensitive tracks on panel surface and can get exact information about finger position. But because detection is based on measuring of changed capacity of surface, therefore sometime it can require calibration of sensitivity. Some of our customers noticed that cursor can behave like crazy when you touch screen (and sometime even without any touch). This can happen when touchscreen controller has increased sensitivity, and it responds to any change of capacity nearby of screen surface and touch controller itself. We know that most of you use this panel right on your workbench full of turned on equipment, powered wires and cables, always turned on solder station – I have exactly the same situation on my desk, so I know it for sure 🙂 In such cases we propose to do the following:
- First of all, take into account that any capacitive touchscreen requires to be placed inside enclosure. This will eliminate most problems with phantom mouse shakes and clicks.
- If you use it without enclosure, then please take care to remove any EMI emitting equipment, connected/powered wires, unbalanced fluorescent lamps, etc. as far away from touchscreen as possible. At least nothing should be under green PCB of touchscreen controller on the bottom side of LCD panel.
- Next is power supply. Check that your power supply provides clean 5V signal on its output. We also recommend to use UPS or good power filter on AC side.
- Finally, you can use special Windows tool to calibrate screen sensitivity to your current environment. Here is link to calibration utility: http://goo.gl/TLK4P. You should connect your panel to Windows PC, use only USB – others connectors are not required. Then run this program, it should find panel, then will ask you to not touch panel during calibration (calibration does not require any interaction with touch surface during whole procedure)
Android Jelly Bean running on Pandaboard (ES)
Linaro team made a huge step forward towards an automated kernel and full Android builds. Below are these simple steps I did to get Android JB running on my Pandaboard ES with LG 10″ with touchscreen. Compare it to our old How-to: https://www.chalk-elec.com/?p=1426 and feel the difference 🙂
- Go to http://releases.linaro.org/12.10/android/leb-panda/ and proceed with “Binary Image Installation” steps. Windows users can get file pandaboard.img.bz2, unzip it and write to SD card with Windows32DiskImager utility.
- Update boot.scr file in boot partition of SD card with correct LCD resolution (1280×800 for LG panel). Ready boot.scr file is here: boot.scr
- After step 2 you should get LCD working. You will see Android GUI and can use mouse. Adding touchscreen requires some kernel re-build.
- Download file linaro_kernel_build_cmds.sh to your Linux computer, change its attribute (+x) and run it. It will automatically download and re-build kernel for Android. Final kernel is located in ./linaro-kernel/out/arch/arm/boot folder (file uImage)
- Now you should update kernel config to include touchscreen support and re-build kernel again. Find file .config in ./linaro-kernel/out folder and uncomment/add options CONFIG_HID_MULTITOUCH=y and CONFIG_HID_NTRIG=y – first option is for old AUO panel, second is for new LG panel. You can add both just in case 🙂
- Comment line “mkdir out/modules_for_android” in script linaro_kernel_build_cmds.sh and run it again. Copy final uImage file to boot partition of your SD card. You can also skip these steps and get my final uImage here: uImage
- Last step is to configure touchscreen as an internal device to fit with LCD panel size. Download file Vendor_1b96_Product_0007.idc and put it to folder /usr/idc on system partition of SD card.
Final SD card image (4Gb card) is here: Android 4.1.2 for Pandaboard(ES)
Video in action is here: Android Jelly Bean (4.1.2) running on Pandaboard ES with touchscreen LCD


